DIY Graphic Tee + Gift Box

GOOD MORNING! Or afternoon, or night, or whatever time it is where you live! 😀 Today I’m sharing my Dad’s entire birthday present…don’t worry-his birthday was last week, hehe!

Everything here today is SHIELD/Marvel themed, but you can do these techniques for any image.

Materials for Graphic Tee:

-Tee Shirt
-Fabric Paint
-Foam Brush
-B&W Computer print out of your image
-Craft Knife
-Iron & Ironing Surface
-Freezer Paper
-Scrap Cardboard/Cardstock (ex. cereal box)
-Pencil

DIY Graphic Tee

1. Place a sheet of freezer paper on top of your image, plastic-side down, and trace your image.
2. With the scrap card stock underneath, cut along the lines of your traced image from your freezer paper. Keep in mind that your paint will go in the negative image, or empty spaces. I really had to think about this!
3. Insert a scrap piece of cardstock and a fresh sheet of freezer paper plastic side up within the t-shirt, smooth out, and place on the ironing surface.
4. Place the cut pieces of freezer paper on your shirt to form a stencil. Remember: the places where your freezer paper is will not have paint on them!
5. Iron the freezer paper onto the fabric! The plastic kinda melts onto the fabric so you can paint without worrying about moving the stencil!
6. Paint away! Make sure to use multiple coats of paint if you want to get a good, opaque color.
7. Once the paint is almost dry to the touch, peel off the freezer paper! I’ve found that it helps to flip up a corner of the freezer paper with the craft knife, and then I can peel the rest off quickly.
8. Let dry for 2 days, or according to the fabric paint directions, then wash inside out. Now it’s ready to be worn and shown off! 🙂


Now for the 0-8-4 Gift Box! For all you non-SHIELD people out there, “0-8-4” is simply a SHIELD term for an item of unknown origin. Like a present, for example!

Materials for 0-8-4 Gift Box:

-Cardboard Box
-Black Acrylic Paint
-White Acrylic Paint
-Foam brush
-Tape
-Computer print out of text, get mine here (Uses D-Day Stencil font from Dafont)
-Craft Knife
-Cardstock, Black Marker, & Ruler for Mission Card

084 Box

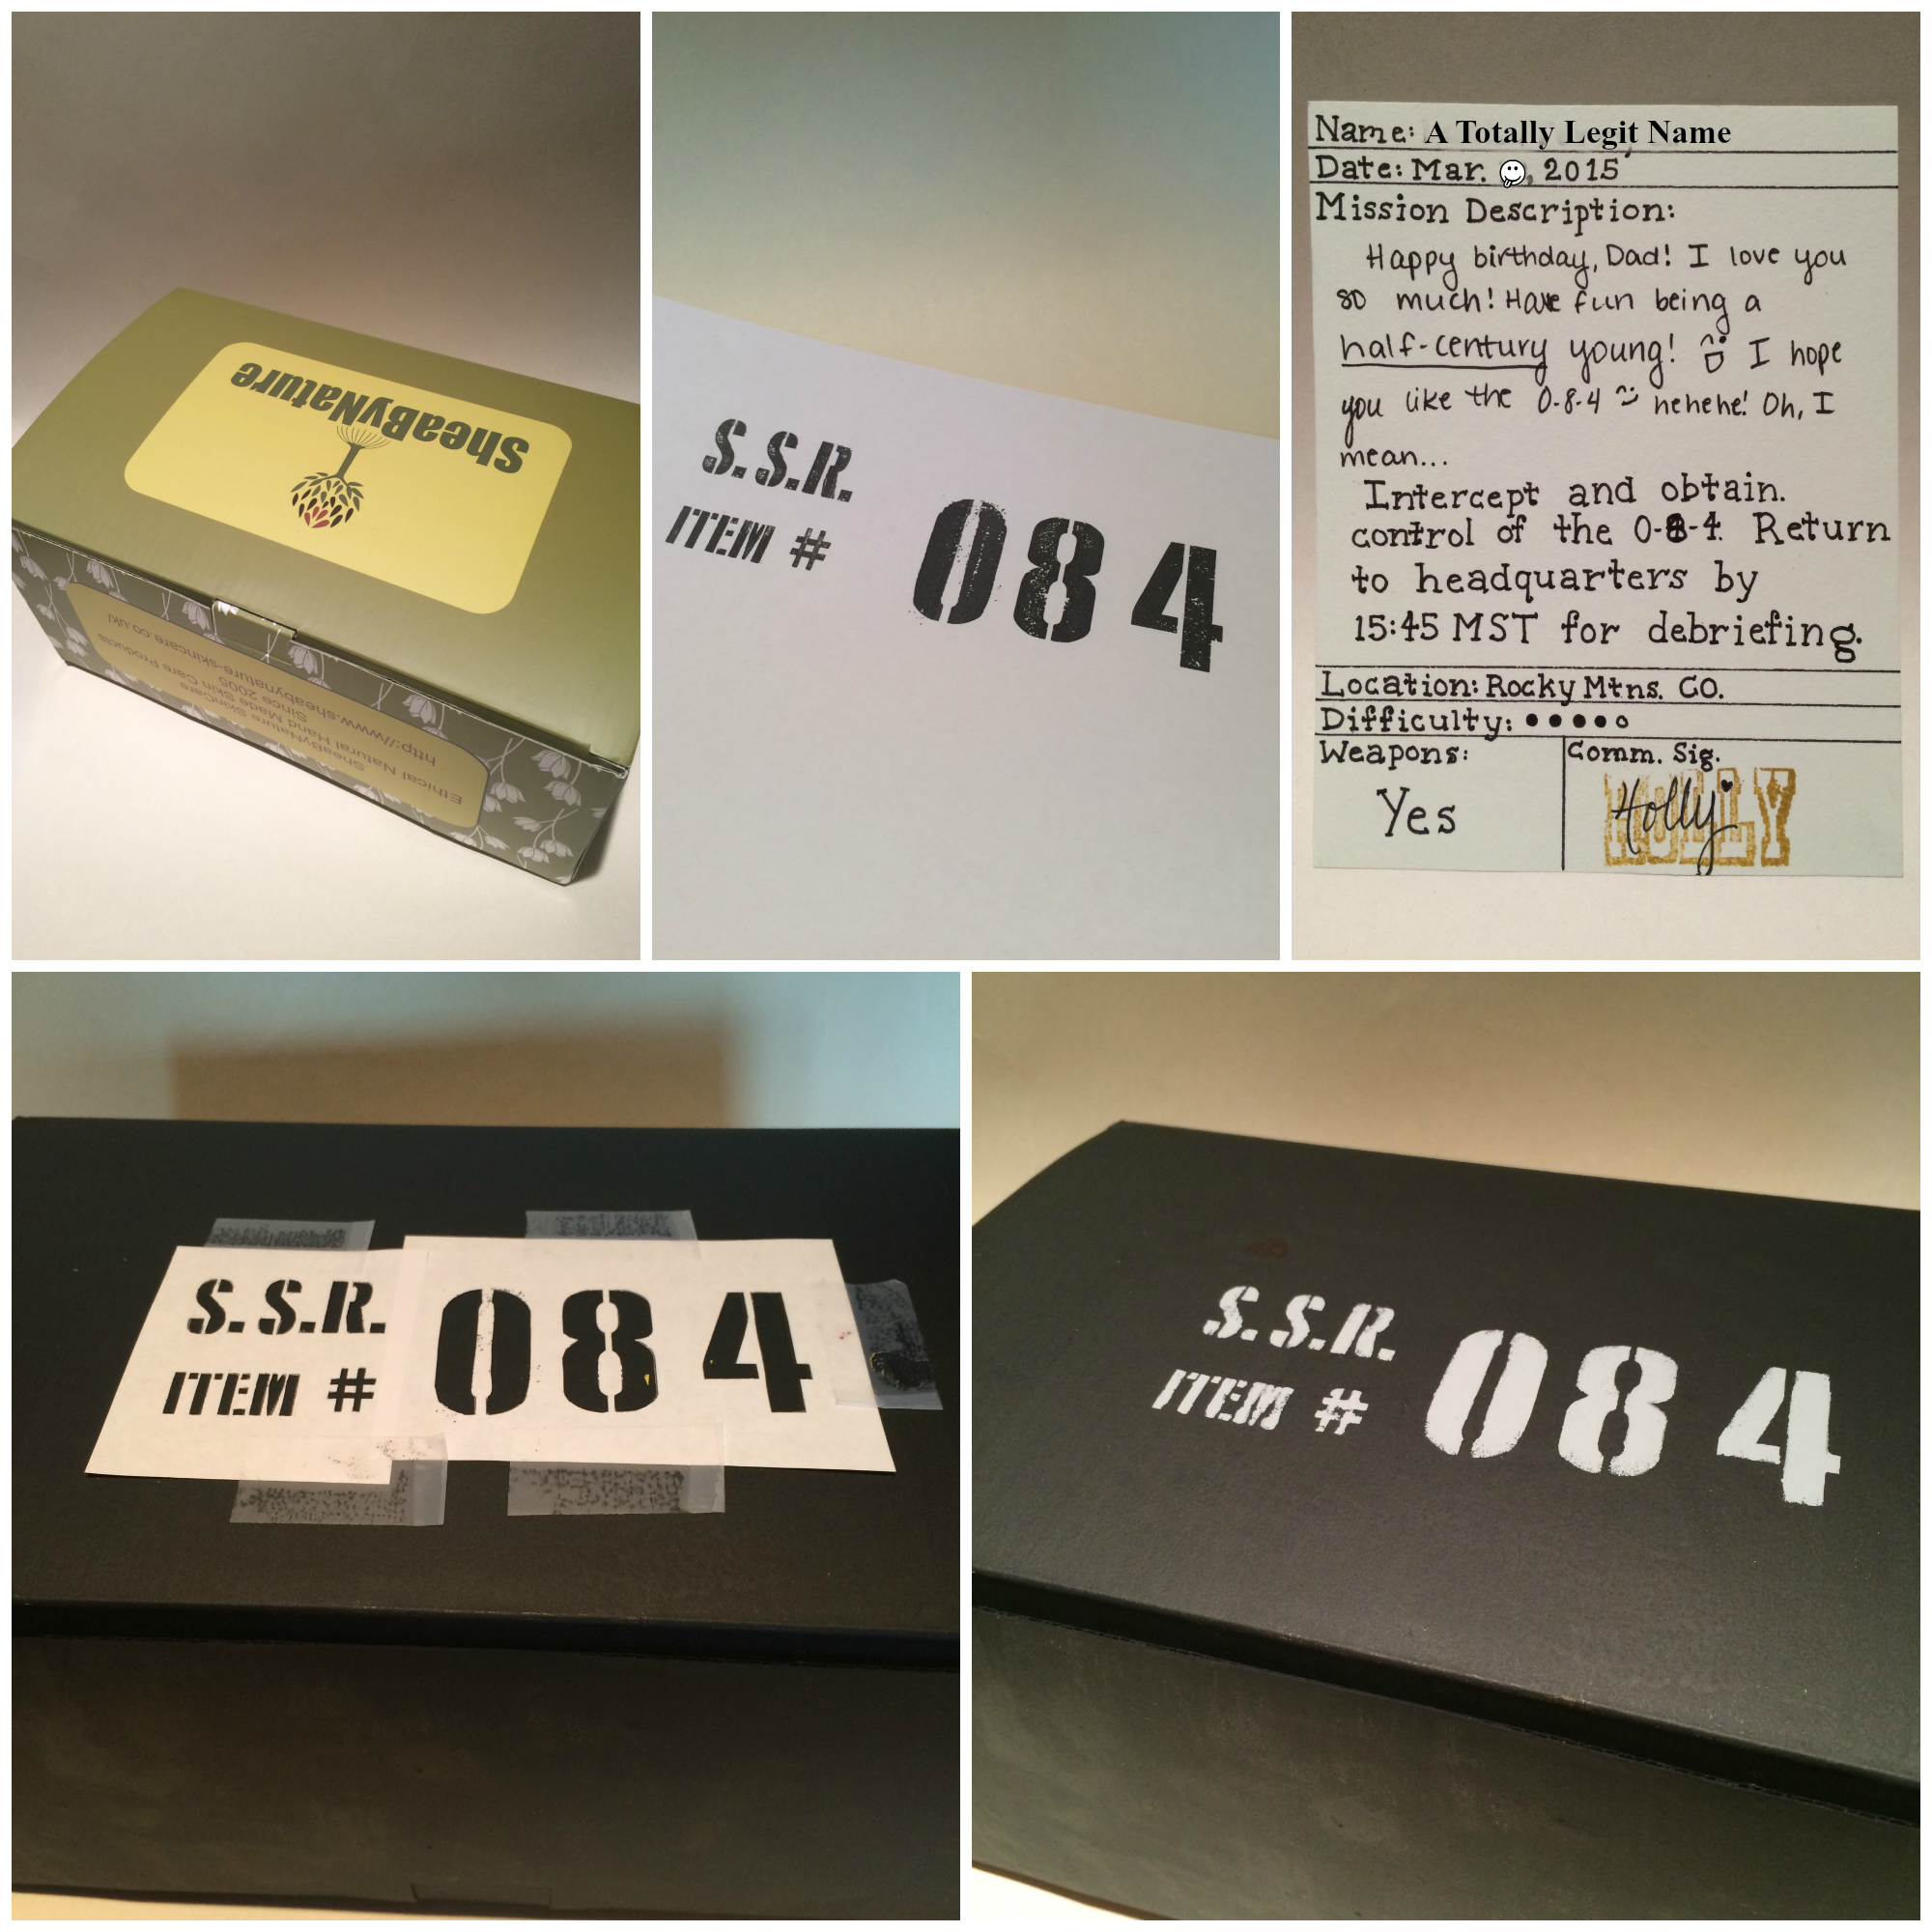
1. Paint your box with a coat of black paint.
2. While that’s drying, cut out the wording (remember, negative image) this time, the stencil will simply be the paper itself. I recommend cutting the “SSR Item #” and “084” into separate pieces of paper to really get them aligned. Set the stencil aside.
3. Paint a second coat of paint onto the box. I tried to get a light texture by daubing the paint- it didn’t dry textured, but it did get a nice, even coat.
4. While it’s drying a second time, make the Mission Card like I did above: sections for name, date, mission description (body of your card), location, difficulty, weapons, and “commander signature”
5. When the box is completely dry, tape the stencils in position. Use the foam brush to dab white or light gray (mix a little black into the white) paint on the stencils. DAB, DO NOT BRUSH! Using a brushing motion will push paint underneath the stencil, plus dabbing paint with a foam brush gives the paint a perfect effect.
6. Remove the stencils, let dry, and the use le box! If needed, touch up the paint with Sharpie.

If you have a Marvel, especially Agents of SHIELD, fan in your life, I promise they will be absolutely delighted with these presents! And if you don’t know what I’ve just been inwardly fangirling about, well you can still make amazing graphic tees with this fabulous technique! Be sure to let me know or send me pictures if you make a shirt (or box) like this!!!

And don’t forget to follow the blog and subscribe to the email newsletter if you want free fonts, printables, and more fantastic stuff! 🙂

Signature

SWITCH Students and Happy St. Patty’s Day!

Hope you had a good St. Patrick’s Day! …We’ll come back to that later…

But first, on an unrelated note, I want to introduce you guys to a really good reference for, basically, life. My church has this fabulous youth group called SWITCH Students, and something new they’re doing this year is a blog to post all the sermons. And the lessons are GREAT! I’m not sure how often they update it (the most recent post is from February but we meet every week), but the posts that are on there now are, in my opinion, super important for teens (and everyone!) in this modern day to read!

SWITCH Students

You know what the best reference is? Yeah? The Bible. UMM YES! I know, it’s challenging (but totally worth it), so look at the SWITCH page for some awesome ways to implement the Bible in your life!

Now I’d like to show you the bracelet I made for a little green accessory 😉 It’s kind of like a charm bracelet, so I think I’ll just make new charms for each holiday!
You just need: jewelry wire, fabric paint, and metal file (optional)

St. Patrick's Day Charm Bracelet

If you want to read more awesome and easy DIYs and craftsy stuff, be sure to follow the blog and subscribe! PLUS, when you subscribe you get a free password organizer, and a free font each month! Whoo!

What’s your favorite holiday craft?

Signature

DIY Stamps

Have you ever had that problem where you have this fabulous craft project idea, with perfect, gorgeous stamps and such? And then realized that you didn’t have that exact stamp, and the effect is totally disastrous without it? And have you ever looked at the prices of stamps at Hobby Lobby?! Um, HELLO, not many crafters are millionaires. (Sorry Hobby Lobby, I really love you!)

Thankfully, there’s a way (as always) to create the stamp you need for super cheap! And you only need 5 things to make it, haha!

Cork Stamps

Materials:

-Clean corks, like from wine…
-Craft knife
-Warm Water
-Marker
-Paper towels
-Rock (optional)

DIY Cork Stamps

1. Soak your corks in the warm water for about 2-5 minutes. Cork floats, so this is where your rock could come in handy- go ahead and weigh the corks down with the rock.

2. Take your corks out and roll them in the paper towels, so they’re not dripping wet. If you want, cut the cork in half so you can make two stamps. Draw the shape of stamp you want on the flattest end of the cork piece.

3. Cut out the surrounding cork. Do this by cutting vertical lines down about a 1/4 in deep to outline the general shape of your design. Turn the cork on its side and cut partially through to remove all the excess pieces. Then go around with the same method to clean up and tweak any edges or points on the shape. I’m not sure if these instructions were clear, so ask questions if you  don’t understand!

Cork Stamping

Once the shape is how you want it, there’s nothing to stop you from creating that beautiful masterpiece! 🙂
P.S. Try ombré stamping!

Signature

5 Crafting Materials You NEED to Have

I don’t know about you, but for me, starting a new project is always daunting if I’m not sure what I need to make it. So if you’re a beginning crafter and just starting your craft-tool-hoarding (trust me, it’ll happen), here are 5 basic crafting tools that you absolutely must have!

5 Materials Pinnable

1. Paper- Get yourself a variety of scrapbook paper! I recommend watching the clearance at Hobby Lobby and Joann (I don’t know about Michaels’) because sometimes there are awesome paper deals.

2. Scissors- You absolutely must have a good pair of scissors! If you’ll be sewing a lot, invest in good fabric scissors as well.

3. Mod Podge- This is my favorite adhesive and sealer because it dries flexible, but try to build up an arsenal of adhesives like glue sticks, glue dots, hot glue, super glue, etc.

4. Ruler- Get a good, sturdy metal or clear plastic ruler with both inches and centimeters so you can switch between the two and use it for straight edges.

5. Markers, Pens, & Pencils- Collect a variety of writing utensils: some for sketches (pencils), some for outlining and colored details (felt-tipped pens), and some for blocked and permanent colors (Sharpie or similar).

Honestly, you probably have a lot of these on hand, so that means you’re ready to start basic crafting! I do want to tell you that a lot of craft tutorials have fancy-schmancy materials listed, but you can usually substitute them for other things you have on hand. I’ve been looking at lots of tutorials that use die-cutting machines. I can adapt to cut different shapes out myself, although it will take a little longer. Other materials are harder to substitute, like glass etching cream…

I hope this post has given you the confidence to start crafting, because there are literally so many things out there to make!
And don’t forget to subscribe to the monthly newsletter and follow the blog, as it truly helps!

Signature

DIY: Valentine’s Candy Sugar Scrub +Free Printable!

Candy Sugar Scrub

Still stuck on what to get your friends for Valentine’s Day? No worries! This sweet sugar scrub is super easy to make, with ingredients you probably have on hand right now!

Materials:
-White Sugar
-Coconut Oil
-Pink “powdery” Candy (like Pixie Stix, Sweethearts, PEZ, etc.)
-Small, cute glass/plastic jars
-Ribbon or colored string
-Label

1. If it’s not already in powdery form, crush the candy until you have fine crumbs about the size of the sugar or smaller. I used a mortar and pestle lined with parchment paper to crush the candy. You could also use the back of a spoon or the end of a rolling-pin. *Note: I would recommend Pixie Stix if you have some because the citric acid has additional skin benefits. If you don’t have some, that’s okay, I used different candy*

2. Mix together two parts sugar, one part candy, and two parts coconut oil. You could definitely use olive oil or another oil like that, but because coconut oil is white, I opted for this. If you use coconut oil, you may have to melt the oil slightly to be able to mix everything well.

3. Clean the edge of the jar, adhere the label to the lid, and finish by tying a pretty ribbon and bow around the neck of the jar.Candy Sugar Scrub

Your girlfriends will be sure to love this luxurious, festive gift! Best of all, I’ve created the labels for you! In this free printable, I’ve made two label designs, both in pink and purple; click on the picture to download the printable file!Candy Sugar Scrub Labels

And if you love DIYs like this one, be sure to Follow the blog and subscribe to the monthly email newsletter!

Signature

Candy Sugar Scrub Pinnable